Home
Search
 
What's New
Index
Books
Links
Q & A
Newsletter
Banners
 
Feedback
Tip Jar
 
C# Helper...
 
XML RSS Feed
Follow VBHelper on Twitter


MSDN Visual Basic Community


TitleSimulate a robot arm with three rotating joints and a hand using XAML code
DescriptionThis example shows how to simulate a robot arm with three rotating joints and a hand using XAML code
Keywordsrobot, robotics, arm, drawing, XAML, WPF
CategoriesGraphics, WPF, VB.NET
 

The basic idea is to consider the stages of the arm one after another and use transformations to move from one to the next.

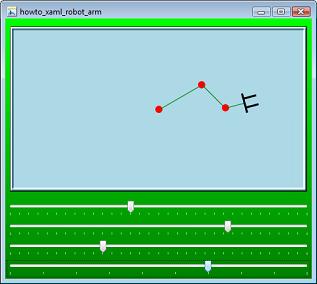
Suppose the three arm segments have lengths L1, L2, and L3 and the angles of rotation at the three joints are A1, A2, and A3.

The first joint rotates the arm by angle A1 at a fixed shoulder. The second joint is translated distance L1 away in the direction of the first arm segment.

The second joint rotates the arm by angle A2 at the "elbow." The third joint is translated distance L2 away in the direction of the second arm segment.

The third joint rotates the arm by angle A3 at the "wrist." The end of the arm is translated distance L3 away in the direction of the third arm segment.


To draw the arm, start by drawing the shoulder at the origin. This example adds a translation first to center the shoulder in the drawing area.

Next the code applies the rotation A1 at the shoulder and draws a rectangle representing the first arm segment. There are is one tricky issue here.

The rotation is prepended to the previous translation so the rotation occurs before the translation that centers the shoulder. Imagine the arm in its own world coordinate space with the shoulder at the origin. The program draws a horizontal rectangle representing the first arm segment. The transformations then rotate it to the correct angle and translate it so the shoulder is centered. This puts the first arm segment in the correct position.

Next the code must draw the elbow joint. To do this, it prepends a translation of distance L1 in the X direction and 0 in the Y direction. It then draws the elbow joint at the origin.

Again imagine the arm in world coordinate space and suppose you draw the elbow at the origin. The new translation moves the joint to (L1, 0). The rotation of angle A1 rotates the joint to match the rotation of the first arm segment. Finally the shoulder's translation moves the whole thing so the base of the first arm segment is centered in the drawing area.

The code continues like this as many times as necessary to draw each arm segment and joint. In eachv step, it prepends the new translations and rotations.


The following code shows how the program draws the third arm segment. Notice how is uses binding to use the angles selected by the slider controls sliJoint1, sliJoint2, and sliJoint3. The values L1 and L2 are static resource values giving the arm lengths. The values Cx and Cy give the center of the drawing area.

 
<!-- Third arm segment -->
<Line X1="0" Y1="0" X2="{StaticResource L3}" Y2="0">
  <Line.RenderTransform>
    <TransformGroup>
      <RotateTransform Angle="{Binding ElementName=sliJoint3, Path=Value}"/>
      <TranslateTransform X="{StaticResource L2}" Y="0"/>
      <RotateTransform Angle="{Binding ElementName=sliJoint2, Path=Value}"/>
      <TranslateTransform X="{StaticResource L1}" Y="0"/>
      <RotateTransform Angle="{Binding ElementName=sliJoint1, Path=Value}"/>
      <TranslateTransform X="{StaticResource Cx}" Y="{StaticResource Cy}"/>
    </TransformGroup>
  </Line.RenderTransform>
</Line>
 
The code finishes by drawing a hand with two fingers. As it does for the rest of the arm, the code draws the pieces of the hand at the origin and uses transformations to move it where it belongs. The following code shows how the program draws the hand. There are lots of details but the only real tricks is how the program draws Finger 1. The sliHand slider control determines how far apart the fingers are. The program uses its value directly to draw Finger 2. To draw Finger 1, it uses a ScaleTransform to reflect the translation across the X axis, making the finger move the negative of the distances selected by sliHand.
 
<!-- Hand - Palm -->
<Line X1="0" Y1="-15" X2="0" Y2="15" Stroke="Black" StrokeThickness="3">
  <Line.RenderTransform>
    <TransformGroup>
      <TranslateTransform X="{StaticResource L3}" Y="0"/>
      <RotateTransform Angle="{Binding ElementName=sliJoint3, Path=Value}"/>
      <TranslateTransform X="{StaticResource L2}" Y="0"/>
      <RotateTransform Angle="{Binding ElementName=sliJoint2, Path=Value}"/>
      <TranslateTransform X="{StaticResource L1}" Y="0"/>
      <RotateTransform Angle="{Binding ElementName=sliJoint1, Path=Value}"/>
      <TranslateTransform X="{StaticResource Cx}" Y="{StaticResource Cy}"/>
    </TransformGroup>
  </Line.RenderTransform>
</Line>

<!-- Hand - Finger 1 -->
<Line X1="0" Y1="0" X2="20" Y2="0" Stroke="Black" StrokeThickness="3">
  <Line.RenderTransform>
    <TransformGroup>
      <TranslateTransform X="0" Y="{Binding ElementName=sliHand, Path=Value}"/>
      <ScaleTransform ScaleX="1" ScaleY="-1"/>
      <TranslateTransform X="{StaticResource L3}" Y="0"/>
      <RotateTransform Angle="{Binding ElementName=sliJoint3, Path=Value}"/>
      <TranslateTransform X="{StaticResource L2}" Y="0"/>
      <RotateTransform Angle="{Binding ElementName=sliJoint2, Path=Value}"/>
      <TranslateTransform X="{StaticResource L1}" Y="0"/>
      <RotateTransform Angle="{Binding ElementName=sliJoint1, Path=Value}"/>
      <TranslateTransform X="{StaticResource Cx}" Y="{StaticResource Cy}"/>
    </TransformGroup>
  </Line.RenderTransform>
</Line>

<!-- Hand - Finger 2 -->
<Line X1="0" Y1="0" X2="20" Y2="0" Stroke="Black" StrokeThickness="3">
  <Line.RenderTransform>
    <TransformGroup>
      <TranslateTransform X="0" Y="{Binding ElementName=sliHand, Path=Value}"/>
      <TranslateTransform X="{StaticResource L3}" Y="0"/>
      <RotateTransform Angle="{Binding ElementName=sliJoint3, Path=Value}"/>
      <TranslateTransform X="{StaticResource L2}" Y="0"/>
      <RotateTransform Angle="{Binding ElementName=sliJoint2, Path=Value}"/>
      <TranslateTransform X="{StaticResource L1}" Y="0"/>
      <RotateTransform Angle="{Binding ElementName=sliJoint1, Path=Value}"/>
      <TranslateTransform X="{StaticResource Cx}" Y="{StaticResource Cy}"/>
    </TransformGroup>
  </Line.RenderTransform>
</Line>
 
 
Copyright © 1997-2010 Rocky Mountain Computer Consulting, Inc.   All rights reserved.
  Updated