|
|
|
| Title | Read data from an Excel workbook in Visual Basic 6 |
|---|
| Description | This example shows how to read data from an Excel workbook in Visual Basic 6. |
|---|
| Keywords | Microsoft Office, Office, Excel, Microsoft Excel, read from Excel, cell color, cell format, Excel cell color, Excel cell format |
|---|
| Categories | Office |
|---|
|
|
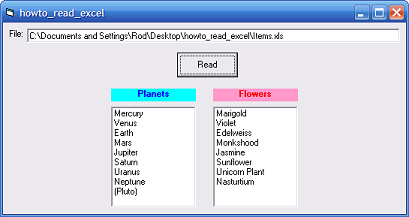
A Visual Basic 6 program can open the Excel application and use it as a server to manipulate Excel workbooks.
First add a reference to "Microsoft Excel 11.0 Object Library" (or whatever version you have installed on your system).
This example uses the following code to open a workbook and read data from it.
|
|
' Read from the Excel workbook.
Private Sub cmdRead_Click()
Dim excel_app As Excel.Application
Dim workbook As Excel.workbook
Dim sheet As Excel.Worksheet

    ' Get the Excel application object.
    Set excel_app = New Excel.Application

    ' Make Excel visible (optional).
    excel_app.Visible = True

    ' Open the workbook read-only.
    Set workbook = excel_app.Workbooks.Open( _
        FileName:=txtFile.Text, ReadOnly:=True)

    ' Get the first worksheet.
    Set sheet = workbook.Sheets(1)

    ' Get the titles and values.
    SetTitleAndListValues sheet, 1, 1, lblTitle1, lstItems1
    SetTitleAndListValues sheet, 1, 2, lblTitle2, lstItems2

    ' Save the changes and close the workbook.
    workbook.Close SaveChanges:=False

    ' Close the Excel server.
    excel_app.Quit
End Sub
|
|
|
First the code creates an Excel.Application object to control Excel. It makes that object visible so you can watch it work. Often you will not want to make the server visible.
Next the code opens a workbook. Most of the Open method's parameters are optional (things such as passwords) so they are omitted. This example opens the workbook read-only because it doesn't need to write into the workbook.
The code uses the first worksheet.
The code calls the SetTitleAndListValues method twice to get data from the worksheet and then closes Excel. The most interesting work is performed by the following SetTitleAndListValues method.
|
|
' Set a title Label and the values in a ListBox. Get the
' title from cell (row, col).
' Get the values from cell (row + 1, col) to the end of the
' column.
Private Sub SetTitleAndListValues(ByVal sheet As _
    Excel.Worksheet, _
    ByVal row As Integer, ByVal col As Integer, ByVal lbl As _
        Label, ByVal lst As ListBox)
Dim range As Excel.range
Dim last_cell As Excel.range
Dim first_cell As Excel.range
Dim value_range As Excel.range
Dim range_values() As Variant
Dim num_items As Integer
Dim i As Integer

    ' Set the title.
    Set range = sheet.Cells(row, col)
    lbl.Caption = CStr(range.Value2)
    lbl.ForeColor = range.Font.Color
    lbl.BackColor = range.Interior.Color

    ' Get the values.
    ' Find the last cell in the column.
    Set range = sheet.Columns(col)
    Set last_cell = range.End(xlDown)

    ' Get a Range holding the values.
    Set first_cell = sheet.Cells(row + 1, col)
    Set value_range = sheet.range(first_cell, last_cell)

    ' Get the values.
    range_values = value_range.Value

    ' Convert this into a 1-dimensional array.
    ' Note that the Range's array has lower bounds 1.
    num_items = UBound(range_values, 1)
    For i = 1 To num_items
        lst.AddItem range_values(i, 1)
    Next i
End Sub
|
|
|
SetTitleAndListValues is a fairly specialized method. It gets a title from a cell and gets values from the cells below that one.
The code first gets a Range representing the title cell. It uses the Range's Value2 property for the title text. It sets the Label's colors from the Range's Font.Color and Interior.Color values.
Next the code gets the values below the title. It first gets a Range representing the entire column. It then uses the Range's End method to get a range representing the column's last used cell. The code creates another Range representing the first cell containing values and then uses the two cells to get a new Range representing all of the value cells. (This is easier if you know where the cells are ahead of time so you don't need to mess around trying to find the last cell.)
The code then uses the Range's Value method to get a 2-dimensional array of values. Note that this is a 2-dimensional array even though it contains only one column.
The code copies the values into the ListBox for display.
|
| |

|
| |
|
|


