Much ado is made of WPF's Grid control and rightly so because it's a pretty powerful control. However, many developers forget that .NET has a TableLayoutPanel control that provides many of the same features.
Place the control on a form. If you select the control, its SmartTag lets you add and remove rows or columns, and edit the rows and columns.
If you click the SmartTag's "Edit Rows and Columns" command, a dialog appears that lets you add and remove rows and columns, and set row and column sizes. You can set a row's/column's height/width to an absolute value in pixels, to a percentage, or to AutoSize to make it resize to fit its contents.
If you resize the control, its rows and columns resize automatically as appropriate. For example, suppose you want to divide a form into two equally sized halves. To do that, you can use a TableLayoutPanel with Dock = Fill and with two columns having widths set to 50%. Now when you or the user resize the form, the columns automatically resize to divide up the form's area.
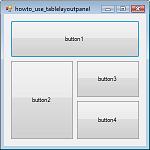
After you build the TableLayoutPanel, you can add controls to it. You can then set a control's RowSpan or ColumnSpan properties to make the control span more than one row or column.
By default, a control is aligned to the upper left corner of its panel cell. Use the control's Anchor properties to align it in a different way. For example, the Anchor value "None" centers the control in its cell. The value "Top, Bottom, Left, Right" makes the control stretch to fill its cell.
Take a few minutes to experiment with the TableLayoutPanel control. Then when you need it later, you may remember that it exists.
|