|
|
|
| Title | Split an image into smaller image files in Visual Basic .NET |
|---|
| Description | This example shows how to split an image into smaller image files in Visual Basic .NET. |
|---|
| Keywords | image processing, graphics, split image, bitmap, split bitmap, save image, example, example program, Windows Forms programming, Visual Basic .NET, VB.NET |
|---|
| Categories | Graphics |
|---|
|
|
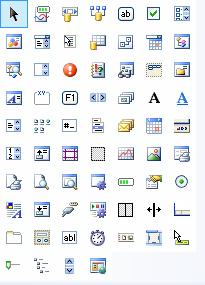
Recently I needed separate bitmap files for the icons in the Visual Studio toolbox. I took a screen shot and then, rather than splitting the icons apart manually, I wrote this program to do it. The following code does most of the work.
|
|
' Split the file.
Private Sub btnGo_Click(ByVal sender As System.Object, ByVal _
    e As System.EventArgs) Handles btnGo.Click
    ' Get the inputs.
    Dim wid As Integer = Integer.Parse(txtWidth.Text)
    Dim hgt As Integer = Integer.Parse(txtHeight.Text)
    Dim bm As Bitmap = LoadUnlocked(txtFile.Text)

    ' Start splitting the Bitmap.
    Dim piece_name As String = _
        Path.GetFileNameWithoutExtension(txtFile.Text)
    Dim piece As New Bitmap(wid, hgt)
    Dim dest_rect As New Rectangle(0, 0, wid, hgt)
    Using gr As Graphics = Graphics.FromImage(piece)
        Dim num_rows As Integer = CInt(bm.Height / hgt)
        Dim num_cols As Integer = CInt(bm.Width / wid)
        Dim source_rect As New Rectangle(0, 0, wid, hgt)
        For row As Integer = 0 To num_rows - 1
            source_rect.X = 0
            For col = 0 To num_cols - 1
                ' Copy the piece of the image.
                gr.DrawImage(bm, dest_rect, source_rect, _
                    GraphicsUnit.Pixel)

                ' Save the piece.
                Dim filename As String = piece_name & _
                    row.ToString("00") & _
                    col.ToString("00") & ".bmp"
                piece.Save(filename, ImageFormat.Bmp)

                ' Move to the next column.
                source_rect.X += wid
            Next col
            source_rect.Y += hgt
        Next row
        MessageBox.Show("Created " & num_rows * num_cols & "" & _
            "files", _
            "Done", MessageBoxButtons.OK, _
                MessageBoxIcon.Information)
    End Using
End Sub
|
|
|
The code gets the name of the file and the width and height that the smaller pieces should have, and loads the original image. It creates a Bitmap of the correct size and a Rectangle representing the area of that Bitmap. It then creates a Graphics object to work with the Bitmap.
Next the code figures out how many rows and columns of smaller images will fit completely within the original image and loops through the rows and columns.
For each row/column value, the code updates a Rectangle object so it describes the area occupied by that piece of the image. It uses the Graphics object's DrawImage method to copy the piece to the new Bitmap and saves the result in a bitmap file. (I needed to use 24-bit bitmaps but you could change the second parameter to the Save method to save as a jpg, png, or some other format.)
|
| |
|
|
| |
| |
 |
| |
|
|


