|
|
|
| Title | Control the print preview dialog to change its size, scale, colors, and more in Visual Basic .NET |
|---|
| Description | This example shows how to control the print preview dialog to change its size, scale, colors, and more in Visual Basic .NET. |
|---|
| Keywords | printing, preview, PrintDocument, print, PrintPreviewDialog, print preview, scale, zoom, auto, maximize, rows, columns, graphics, PrintPage |
|---|
| Categories | Graphics, VB.NET |
|---|
|
|
The PrintPreviewDialog component provides a lot of features but most of them are hard to find. Some are provided by the PrintPreviewControl that the dialog contains. You can set others if you treat the dialog as a form. This example shows how to set the dialog's:
- Size and whether it is maximized
- Titlebar text
- Zoom level (including Auto)
- Anti-aliasing
- Page display rows and columns
- Background color and "paper" color
- Starting page number
The following code shows how the program displays the dialog.
|
|
Private Sub btnPreview_Click(ByVal sender As System.Object, _
ByVal e As System.EventArgs) Handles btnPreview.Click
' Display a print preview.
' Set the size.
Dim frm As Form = DirectCast(ppdShapes, Form)
If (chkMaximized.Checked) Then
' Display maximized.
frm.WindowState = FormWindowState.Maximized
Else
' Make the client area 400 x 400.
frm.WindowState = FormWindowState.Normal
frm.StartPosition = FormStartPosition.CenterScreen
ppdShapes.ClientSize = New Size(400, 400)
End If
' Set the dialog's title.
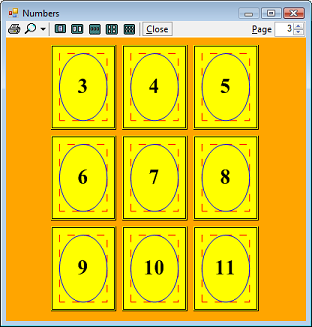
frm.Text = "Numbers"
' Set the zoom level.
If (chkZoom100.Checked) Then
' 100%.
ppdShapes.PrintPreviewControl.Zoom = 1.0
Else
' Auto.
ppdShapes.PrintPreviewControl.AutoZoom = True
End If
' Set anti-aliasing.
ppdShapes.PrintPreviewControl.UseAntiAlias = _
chkAntiAlias.Checked
' Set other properties.
ppdShapes.PrintPreviewControl.Columns = 3
ppdShapes.PrintPreviewControl.Rows = 3
ppdShapes.PrintPreviewControl.BackColor = Color.Orange '
' Background color.
ppdShapes.PrintPreviewControl.ForeColor = Color.Yellow '
' Paper color.
ppdShapes.PrintPreviewControl.StartPage = 3 '
' Page 3 in the upper left.
' Display the dialog.
ppdShapes.ShowDialog()
End Sub
|
|
|
The code starts by making a variable that represents the dialog as a Form. This provides access to its form-related properties such as size.
If the Maximized checkbox is checked, the program set the Form's WindowState property to Maximized. If the checkbox is not checked, the code sets WindowState to Normal, sets StartPosition to center the Form, and sets the dialog's client size (the area inside its borders).
Next the code sets the Form's Text property to give the dialog a title.
The other dialog properties set by this example are provided by the PrintPreviewControl contained within the dialog.
If the 100% Zoom checkbox is checked, the code sets the control's Zoom property to 1.0. If the checkbox is not checked, the code sets the control's AutoZoom property to true.
The code next sets the control's UseAntiAlias property to true or false depending on whether its checkbox is checked. Turning anti-aliasing on makes the result smoother (you'll probably have to look closely to see the difference) but can make drawing the preview take longer if it's a complicate printout.
The code sets the control's Columns and Rows properties so the dialog display 9 pages in 3 rows and columns. It sets the background color (behind the pages) to orange and sets the foreground color (used for the pages' "paper") to yellow. Finally the code sets the control's StartPage property to 3 so initially page number 3 is the one shown in the preview's upper left corner.
The way the actual printing works isn't described here. For more information, see this example:
|
| |
|
| |
|
|


