|
|
|
| Title | Make a close-up window for an image in Visual Basic .NET |
|---|
| Description | This example shows how to make a close-up window for an image in Visual Basic .NET. |
|---|
| Keywords | closeup, close-up, closeup window, close-up window, zoom, picture, image, details, Visual Basic .NET, VB.NET |
|---|
| Categories | Graphics |
|---|
|
|
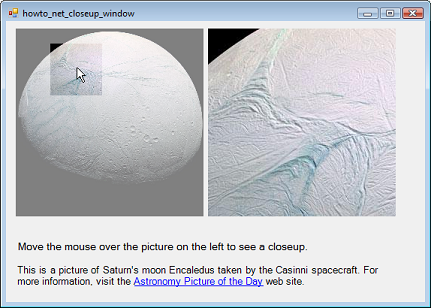
Lately I've seen several web sites that display a close-up window that displays zoomed-in piece of an image so you can see extra details. You move the mouse around on the main image and it displays the close-up in a separate picture. This example does something similar. (Some of the math the example uses is pretty tricky so you may need to look at it pretty hard to see how it works.)
The close-up is really just a full-scale copy of the original image. (The "main" image is the same image at a smaller scale.) To display a close-up, the program displays the full-scale image inside a PictureBox named picCloseup. That control sits inside a Panel named panCloseup. By moving picCloseup inside panCloseup, the program can display different pieces of the full-scale image.
When the program starts, it saves its original image and makes a lightened version of the image. To make the lightened version, it copies the original version and then fills it with a semi-transparent white rectangle. This becomes the main image that you move the mouse over.
|
|
' Save the original image.
Private OriginalImage, ShadedImage As Bitmap
Private SmallWidth, SmallHeight As Integer
Private ScaleX, ScaleY As Single

Private Sub Form1_Load(ByVal sender As System.Object, ByVal _
    e As System.EventArgs) Handles MyBase.Load
    OriginalImage = DirectCast(picWhole.Image, Bitmap)
    picCloseup.Image = OriginalImage
    picCloseup.SizeMode = PictureBoxSizeMode.AutoSize

    ' Make a shaded version of the image.
    ShadedImage = New Bitmap(OriginalImage)
    Using gr As Graphics = Graphics.FromImage(ShadedImage)
        Using br As New SolidBrush(Color.FromArgb(128, 255, _
            255, 255))
            Dim rect As New Rectangle(0, 0, _
                ShadedImage.Width, ShadedImage.Height)
            gr.FillRectangle(br, rect)
        End Using
    End Using

    ' Get scale factors to map from big scale to small
    ' scale.
    ScaleX = CSng(panCloseup.ClientSize.Width) / _
        OriginalImage.Width
    ScaleY = CSng(panCloseup.ClientSize.Height) / _
        OriginalImage.Height

    ' See how big the closeup is on the small scale.
    SmallWidth = CInt(ScaleX * picWhole.ClientSize.Width)
    SmallHeight = CInt(ScaleY * picWhole.ClientSize.Height)
End Sub
|
|
|
Normally the program displays the original image. When the mouse enters that image, the program displays the shaded version. When the mouse leaves, it restores the original image.
|
|
' Use the shaded background image.
Private Sub picWhole_MouseEnter(ByVal sender As _
    System.Object, ByVal e As System.EventArgs) Handles _
    picWhole.MouseEnter
    picWhole.Image = ShadedImage
    panCloseup.Visible = True
End Sub

' Use the regular image.
Private Sub picWhole_MouseLeave(ByVal sender As Object, _
    ByVal e As System.EventArgs) Handles picWhole.MouseLeave
    picWhole.Image = OriginalImage
    panCloseup.Visible = False
End Sub
|
|
|
When the mouse moves over the main image, the program displays a close-up of the area around the mouse.
|
|
' Display a closeup of this area.
Private ViewingRectangle As Rectangle

Private Sub picWhole_MouseMove(ByVal sender As _
    System.Object, ByVal e As _
    System.Windows.Forms.MouseEventArgs) Handles _
    picWhole.MouseMove
    ' Position picCloseup inside its parent Panel.
    Dim x As Single = CSng(e.X) / picWhole.ClientSize.Width _
        * OriginalImage.Width - _
        CSng(panCloseup.ClientSize.Width) / 2
    Dim y As Single = CSng(e.Y) / _
        picWhole.ClientSize.Height * OriginalImage.Height - _
        CSng(panCloseup.ClientSize.Height) / 2
    If (x < 0) Then x = 0
    If (y < 0) Then y = 0
    If (x > OriginalImage.Width - _
        panCloseup.ClientSize.Width) Then
        x = OriginalImage.Width - _
            panCloseup.ClientSize.Width
    End If
    If (y > OriginalImage.Height - _
        panCloseup.ClientSize.Height) Then
        y = OriginalImage.Height - _
            panCloseup.ClientSize.Height
    End If
    picCloseup.Location = New Point(-CInt(x), -CInt(y))

    ' Record the position we are viewing.
    ViewingRectangle = New Rectangle(CInt(x), CInt(y), _
        panCloseup.ClientSize.Width, _
        panCloseup.ClientSize.Height)

    ' Draw the closeup area.
    picWhole.Invalidate()
End Sub
|
|
|
First the code decides where the area around the mouse is. If that area lies partly outside of the main image, it adjusts its X and Y coordinates so the area lies within the main image so the close-up shows as much of the image as possible.
The code moves picCloseup within panCloseup to display the correct piece of the full-scale image. It then records the area on the main image that it will display in the variable ViewingRectangle and invalidates the main image to make it redraw.
The following code shows the main picture's Paint event handler.
|
|
' Draw the viewing area.
Private Sub picWhole_Paint(ByVal sender As System.Object, _
    ByVal e As System.Windows.Forms.PaintEventArgs) Handles _
    picWhole.Paint
    ' Scale so we can draw in the full scale coordinates.
    e.Graphics.ScaleTransform(ScaleX, ScaleY)

    ' Draw the viewing area using the original image.
    e.Graphics.DrawImage(OriginalImage, ViewingRectangle, _
        ViewingRectangle, GraphicsUnit.Pixel)
    'e.Graphics.DrawRectangle(Pens.Red, ViewingRectangle)
End Sub
|
|
|
This code uses a transformation so it can draw using the full-scale image's coordinates instead of those used by the main image (which you may recall is at a reduced scale). It then copies part of the original full-scale image onto the main image to show the area around the mouse. The result is that the main image is shaded except for this area, which is drawn with its original brightness. Uncomment the last line in this method to draw a red rectangle around the close-up area in the main image.
This is a confusing example but it's a very cool effect so I encourage you to download it and give it a try. If you experiment with the code a bit, you can figure out how it works. (And Enceladus is a particularly strange moon to look at!)
|
| |

|
| |
|
|


